Click below for downloading Internet Download Manager (IDM) for free
Internet Download Manager (IDM) 6.31 Build 3 Free download
Click below for downloading Internet Download Manager (IDM) for free
Now do any work on the mobile with Voice !!!!
- With the help of our voice, we can turn on or off WiFi, Bluetooth. If I say "WiFi" in front of the mobile, then WiFi will be turned on. And if I say "stop WiFi " then WiFi will be turned off. There is no need to touch the mobile.
- When the screen is off, the button will open just saying "open".
- We also can open any apps by talking. If we say "boy MX player pro" from home screen, then the MX player will be open. Here the "boy " is a specific signal, anything else can be used here.
- If in any app's, say "cancel", then it will come out from the apps automatically.
To download--
Create your own Run Command
Some hidden features of windows 10 (Part-1)
1. Hidden Start menu
2.Change your screen rotation using the keyboard
3. Quick jump multitasking screen(virtual desktop)
4. Transparent CMD (Command prompt)
Look at what's happening in your next room with Android phone...
Various effective use of Windows - run
![]() |
| Windows-Run |
Many of us use the computer. But we do not know many uses of the run. Let us know some useful information about the run command.
- Accessibility Controls - access.cpl
- Accessibility Wizard - accwiz
- Add / Remove Programs - appwiz.cpl
- Administrative Tools - control admintools
- Automated Update - wuaucpl.cpl
- BlueTooth File Transfer Wizard - fsquirt
- Calculator - calc
- Certificates - certmgr.msc
- Character Map - charmap
- Clipboard viewer - clipbrd
- Control Panel - control
- Computer Management - compmgmt.msc
- Component Services - dcomcnfg
- Command Prompt - cmd
- User Accounts - control userpasswords2
- Display Properties - desk.cpl
- Display Properties - control desktop
- Disk Partition Manager - diskpart
- Dix Management - diskmgmt.msc
- Decry defragment - dfrg.msc
- Dix Cleanup - cleanmgr
- Device Manager - devmgmt.mscDirectX – dxdiag
- D.D. shares - ddeshare
- Date and Times - timedate.cpl
- Windows Address Book Import Utility – wabmigWord pad - write
- Windows XP Tour - tourstart
- Windows version - winver
- Update Lunch - wupdmgr
- Windows System Security Tools - syskey
- Windows messenger - msmsgs
- Windows Media Player - wmplayer
- Windows Management - wmimgmt.msc
- Windows Magnifier - magnify
- Windows Firewall - firewall.cpl
- Windows Explorer - explorer
Reduce your computers CPU usage in Windows
Tips to find your silenced Android device
There are easy ways to find mobile. Call from someone else's phone, and watch where your phone is playing. But if the phone is silent, then it's gone. The phone is in grinding condition to find out.
And if there were such incidents in the office, then there is no word. Office Lett, boss Bush - will not be exempt from some Find out if the phone is silent but how to find out the mobile.
1. Go to Google's website from any other mobile or computer first.
2. Enter 'Find My Phone' in the search bar.
4. You will see your mobile location in Google.
3. After that sign into Google account or Gmail account.
5. After that, you will have an option that will allow you to 'on' your device's Android Device Manager.
6. Select this time ring option.
7. While your phone is in Silent mode, it will begin to ring in full volume. And as long as you find out the phone and pressing its power button, the phone will remain in the ring.
In this same way, you can find your lost Android tab. But one thing you have to be careful about. That is, you must be signed into your Google Account from your device. Otherwise, the lost mobile will not be found in this system.
Now you can Earn mobile recharge from INTERNET by using your android device
Free Recharge.apk from playstore. after downloading you have to sign up . when you complete your sign up you will get bonus. after that you have to download and use apps for 30 sec to earn money.
Some Screenshort For The App
![]() |
Recharge.apk apps screenshot Fig-1
Recharge.apk apps screenshot Fig-2
Recharge.apk apps screenshot Fig-3
Recharge.apk apps screenshot Fig-4
তো আর দেরি না করে নিচের লিংক থেকে ডাউনলোড করে নিন।
Thanks To all….
তো আর দেরি না করে নিচের লিংক থেকে ডাউনলোড করে নিন।
Make Your Old Android Device Fast & Powerful !!!!!!!!
If your old Android device has started showing its age and you cannot upgrade to a newer one for one or the other reason, here are a few simple tips that will greatly help in improving the overall performance of your Android device.
6. Factory reset – Over a period of time, you end up installing/uninstalling hundreds of apps on your Android device. You also end up with a bunch of apps that you will probably never use, but they silently run in the background, draining battery and consuming precious resources.
Doing a factory reset will give you a platform to start fresh. I will also recommend readers to format the internal storage/micro SD card, if any, as it will get rid of all the junk files and folders left behind by uninstalled apps, and also help you reclaim some free space. Make sure you only install the apps and games that you actually need. This way you will make sure you don’t end up installing unneeded apps that run in the background and consume precious resources.
5.Update Software – If you are not pretty tech-savvy and have a particularly old Android device, chances are there must be a software update or two available for it. While most of the software updates generally fix some bugs and improve battery life, a Jelly Bean update can do wonders for your device.
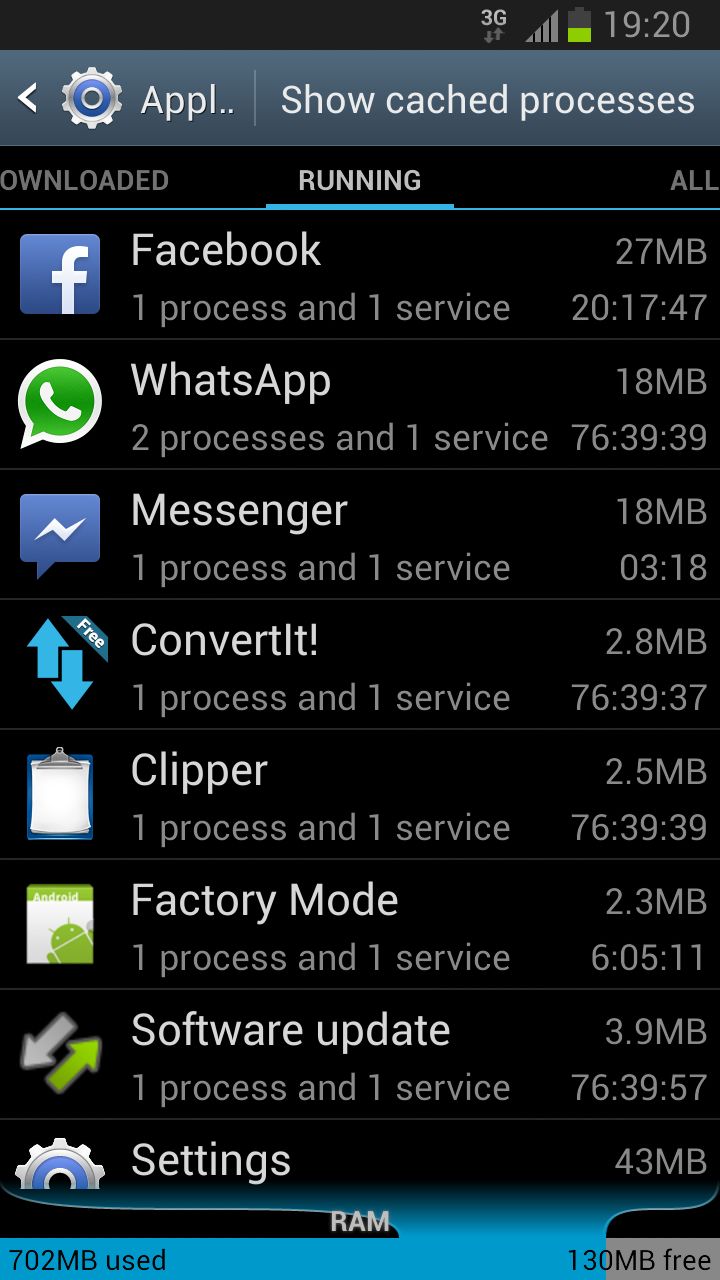
4. Disable System apps – One of the main reasons why your Android device slows down over time is due to the lack of RAM. Apps keep running in the background take up precious RAM, which greatly slows down your device. While the 1st point above will definitely help you in reducing RAM usage, you can reduce it further by disabling some of the system apps that unnecessarily run in the background.
3. Greenify – Greenify is a must have app if you own a pretty old Android device. The app basically allows you to hibernate apps from running in the background, which helps in saving resources and improves battery life. Hibernating an app using Greenify does not have any side-effect. The app will work just fine when you open it. You can also Greenify some of the system apps from the paid version of the app without any issues.
Even on a device like the Galaxy S3, Greenify can do wonders and help you free up a lot of RAM that is otherwise taken up by apps that you are not using.
2. LagFix – Some manufacturers use cheap NAND to help reduce their total manufacturing cost. While they don’t save much by going cheap on the NAND, they do end up sacrificing performance. While at first the side effects of a slow NAND are not visible, they can greatly affect the performance of an Android device after six to twelve months.
On such devices, using LagFix can lead to a major boost in NAND performance, which can greatly improve the system responsiveness under load. You can download LagFix from here, but keep in mind that you must have root access to use it.
1. Root and flash a Custom ROM – If the above steps fail, your last resort is to root your Android device and flash a custom ROM. While rooting can be a tedious process, the gain in speed on your Android device will be totally worth it. As a bonus, you will also get to use some new features, and depending on the custom ROM you flash, also enjoy a new version of Android.
Tricks to Unlock Pattern Lock On Android Without Losing Data
Method 1st:- Unlock Android Pattern/Password Lock
- Download Aroma File Manager.
- A memory card for android device.
- You android device either locked by pattern lock or password lock.
Method 2nd:- Unlock Android Pattern Lock

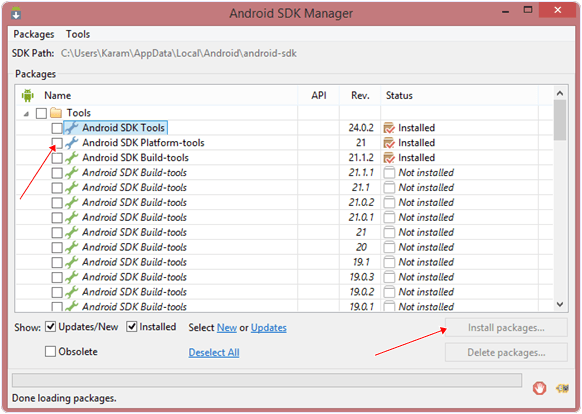
- Download and install Android SDK Tools for run ADB commands. Now select platform according to you download and install it.
- After installing open it, unchecked the other packages and check Android SDK Platform-toolsand then click on install packages according to the image given below.
2. So the other requirement is USB Debugging should be enable before your android device locked.
3. The process will not be helpful if you doesn’t have specific and compatible drivers for your phone. So you should be very careful While installing your device compatible drivers.
Steps To Unlock Android Pattern Lock
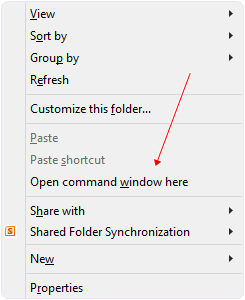
Step 2. Open folder where you installed Android SDK Tools Users >> App Data >> Local >> Android >> Android-SDK >> Platform-Tools and then click on blank space hold shift and click right mouse button and select “open command window here”.
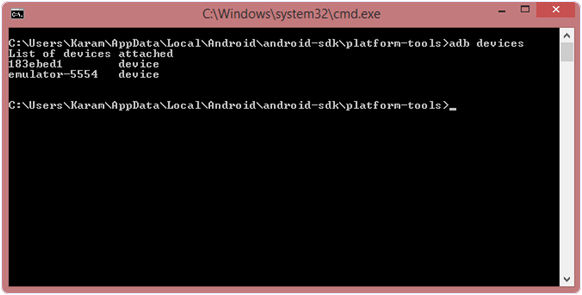
Step 3. It will open you command window now you have to put some commands in the command window:-
ADB DEVICES
ADB SHELL
CD /DATA/DATA/COM.ANDROID.PROVIDERS.SETTINGS/DATABASES
SQLITE3 SETTINGS.DB
UPDATE SYSTEM SET VALUE=0 WHERE NAME=’LOCK_PATTERN_AUTOLOCK’;
UPDATE SYSTEM SET VALUE=0 WHERE NAME=’LOCKSCREEN.LOCKEDOUTPERMANENTLY’;
.QUIT
ADB SHELL RM /DATA/SYSTEM/GESTURE.KEY
নিজের ইচ্ছে মতন নিজেই বানিতে নিতে পারেন যে কনো কিছুর একটি Run Command
আজকে দেখবো কিভাবে নিজের ইচ্ছে মতন নিজেই বানিতে নিতে পারেন যে কনো কিছুর একটি Run Command। এটি দিয়ে আপনি সহজে রান কমান্ড দিয়ে আপনার ইচ্ছে মত প্রোগ্রামে ঠুকতে পারবেন কম সময়ে। ছবি,গান, সফটওয়্যার মানে আম্নার ২ নয়নে যা ধরে তাই বানিতে নিতে পারেন রান কমান্ড। আজকে আমি একটি ছবির রান কমান্ড বানিয়ে দেখাবো এক্সাম্পল হিসাবে। খেলাম করুন আমার ছবিটির নাম linuxdj2.jpg এবং এটি আছে এই ফোল্ডারে C:\Documents and Settings\Administrator\Desktop\New Folder
তাহলে চলেন শুরু করি।
Step 1: প্রথমে “Start” থেকে “Run” এ গিয়ে টাইপ করেন regedit
Step 2: এখন নিচের জায়গা মত খুঁজে খুঁজে সেখানে যান -
প্রথমে এখানে HKEY_LOCAL_MACHINE
এখন এখানে SOFTWARE
তারপরে Microsoft
তারপরে Windows
তারপরে CurrentVersion
অবশেষে Apps Path এ ক্লিক করুন।
Step 3: এখন Apps Path এর উপরে রাইট ক্লিক করেন। তারপরে “New” এ ক্লিক করে “Key” তে ক্লিক করেন
Step 4: দেখুন একটি ফোল্ডার তৈরি হয়েছে এটার নাম দেন আপনে যে ফাইলের রান কমান্ড বানাতে চান সেই নাম দিন। যেমন আমি দিয়েছি linuxdj2.jpg [অবশ্যই নামের শেসে এক্সটেনশন দিতে হবে যেমন .jpg]
Step 5: আপনার বানানো ফোল্ডার এর উপরে ক্লিক করেন এখন ডান পাসে তাকিয়ে দেখুন default নামের একটি string ফেলু দেয়া আছে সেটির উপরে ডাবল ক্লিক করে ওপেন করুন
Step 6: এখন “value data” এর নিচে লিখার জায়গায় আপনার ফাইলটি যেখানে আছে সেই ঠিকানা টি লিখুন এবং সবার শেসে একটি স্লেশ দিয়ে সেই ফাইলটির নাম দিন। যেমন আমি দিয়েছি C:\Documents and Settings\Administrator\Desktop\New Folder\linuxdj2.jpg
Step 7: এখন সাদা জায়গায় রাইট ক্লিক করে তারপরে “New” এ ক্লিক করে “String Value” তে ক্লিক করুন তারপরে দেখুন একটি নতুন ভেলু এড হয়েছে এটির নাম দিতে হবে। নাম দিয়ে দিন Path. এখন উপরে ডাবল ক্লিক করে ওপেন করুন এবং আগের মতন “value data” এর নিচে লিখার জায়গায় আপনার ফাইলটি যেখানে আছে সেই ঠিকানা টি লিখুন এবং সবার শেসে একটি স্লেশ দিয়ে সেই ফাইলটির নাম দিন।
Tricks to Create a Bootable USB Drive Without Using Any Software
To create a bootable USB drive as a Windows installation media, we require at least 4 GB for minimum capacity. Larger capacity is better. At this moment, I use the USB flash drive with 2 GB of capacity as just an example. It's due to some reasons that my 4 GB flash drive encountered an unusual problem that i have to fix later. :D
- Insert your USB flash drive to your running computer. As the first step, we need to run Command Prompt as administrator. To do this, we need to find cmd by typing 'cmd' in the search box on Windows Start Menu. After search result for 'cmd' appears, right click on it and select "Run as administrator".
- Type 'diskpart' on Command Prompt (without quotes) and hit Enter. Wait for a while until the DISKPART program run.
- Type 'list disk' to view active disks on your computer and hit Enter. There would be seen that the active disks shown as Disk 0 for hard drive and Disk 1 for your USB flashdrive with its total capacity.
- Type 'select disk 1' to determine that disk 1 would be processed in the next step then hit Enter.
- Type 'clean' and hit Enter to remove all of data in the drive.
- Type 'create partition primary' and hit Enter. Creating a primary partition and further recognized by Windows as 'partition 1'.
- Type 'select partition 1' an hit Enter. Choosing the 'partition 1' for setting up it as an active partition.
- Type 'active' and hit Enter. Activating current partition.
- Type 'format fs=ntfs quick' and hit Enter. Formatting current partition as NTFS file system quickly.
- Type 'exit' and hit Enter. Leaving DISKPART program but don't close the Command Prompt instead. We would still need it for next process.
Make your PC/Laptop;s Shut Down Services Faster...............
To open the Registry Editor, click WINDOWS + R, then type regedit and hit Enter. In the Registry Editor, browse to HKEY_LOCAL_MACHINE\SYSTEM\CurrentControlSet\Control and double-click the string WaitToKillServiceTimeout on the right-hand side. Change the value from 12000 to 2000 and click OK. Services will now be shut down after 2 seconds, rather than 12.
The Fastest Way of searching the directory in windows by Command Prompt
List and save the directory’s name in text file|Computer Tricks
This computer trick will save the all sub directory and file names in text file. This may helpful to analyse the direcotry(you can know what are the contents inside the window without browsing by simple commands).Step 1:
First of all open command Prompt.
Step 2:
Browse to folder which you want to analyze the sub directories and files by using cd commands. For Example if you want to visit d:/interview folder then
try this command.
Type “d:”
then “cd interview”.
Step 3:
after navigate to direcotry in command prompt,
Type this command :
This will list all sub directories and files with their extension.
If you want to list only pdf files just use this command
(or)
dir Resume.doc /s /b > dirlist.txt
you can find the dirlist.txt file in that directory. i mean it will d:/interview directory.
Step 5:
open the text file in notepad or notepad++ ,then search your desired file name or folder(for example “resume”),you will get the full path to the file. This is fastest search than the usual windows search.
Time is important. Don’t waste your time, use this computer trick to search the drive or folder faster.
Verify your Facebook page
Step By Step page verification
Facebook pages verified methods
Let’s see how Facebook Pages will be verified?
1. Enter the page you want to Verified
2. Click Setting
3.Click on the General menu on the left side of the Page Verification
4. Click Verify this Page
5. Enter your business phone number
6. Select the language of your country and click Call me Now
7. Enter the verification code to your page
8. Verification Complete
Find your Windows 10 Product Key
How to Find Windows 10 Product Key
It’s impossible to use your product key of the older version (Say Windows 7 or Windows 8) to install Windows 10, but during the initial installation steps this key might come handy. Using a third party app, you will be able to find the product key that’s has been assigned to your system by Microsoft on Windows 10. There are many of these third party apps but only a few of them stand out to be the best because of the ease and the functionality they provide. Among such sophisticated program for this purpose, there is ProduKey which is extremely useful app. Using this program, you will be able to find product keys for both 32- and 64-bit and this depends on your system. Follow the below listed steps to download ProduKey and get started.- Head over to the hyperlinked page and download ProduKey app.
- You can download ProduKey for the type of system that you have. Download the normal one for 32-bit systems and the x64 version for 64-bit systems.
- After you have downloaded it, just run the file that reads ProduKey.exe, and this will show a prompt on Windows 10.
- Click on More Info and then click on Run Anyway. This will run ProduKey. It is totally safe to do so!
- As soon as ProduKey starts, you will be able to see product keys not only for your Windows operating system but also for Microsoft Office and other Microsoft apps/programs.
You can now save your product key somewhere safe and make sure that you do not lose it this time. This was a small tutorial in which I told you how to find your Windows 10 Product Key easily. If you have any questions, you can get them cleared in the comments below
Fix Kernel Security Check Failure in Windows 10
Method #1: Use System File Checker & Memory Diagnostic Tool
- When Windows fails to start correctly it should automatically detect that something is wrong and ask you what you want to do – here you need to click “See advanced repair options”.
- Now click on “Troubleshoot” and then once again go to “Advanced Options”.
- In Advanced Options click on “Startup Settings”, and then click the Restart button on bottom right.
- Now Windows 10 will reboot with the minimum settings, also known as safe mode – note that if this fails then you must skip to Solution 2 and ignore everything else in Solution 1.
- If however it did work, you should be a desktop that might look a bit weird but that’s fine.
- Now open your Start Menu and type “cmd”, once you see Command Prompt, right click on it and click “Run As Administrator”.
- Now you have to type “sfc /scannow” in the Command Prompt and press Enter.
- Now wait for the scan to finish – if it finds any issues it will attempt to resolve them itself.
- Once the command has finished, you can close Command Prompt.
- Now you have to open your start menu once again and type “mdsched.exe”.
- This will open the Memory Diagnostic tool, where you need to click on “Restart now and check your problems”.
- Now Windows should reboot and start testing your memory for errors.
If your RAM did not have any errors but you are still getting BSOD’s, you might want to try solution 2 – know that you will require the Windows install files for this, which you can download directly from Microsoft.
Method #2: Fixing Using BCDEdit
- Once you have a bootable DVD or USB stick ready to boot, restart your PC with the bootable device connected.
- Boot into the Windows setup and click Next.
- Now choose the Troubleshoot option and click Advanced Options.
- In Advanced Options click “Command Prompt” and type “C:” in the window that pops up, then press Enter.
- Now type “BCDEDIT /SET {DEFAULT} BOOTMENUPOLICY LEGACY” and press Enter.
- Wait for the command to execute and when it is finished, type “exit” and press Enter to close the command prompt.
- Now you should be back on the “choose an option” screen, click Continue here.
- Now your PC should start as normal.
TOP 5 Useful Android Apps
1.Office Lens - Easy Way to Scan any document by phone camera. Its like pocket Scanner must try it. https://play.google.com/store/apps/details…
2.Floating Stickies - A sticky note is the best solution to manage important notes and reminders. Must try it and comment.
3.Tapet - Infinite Wallpapers- Make Your own wallpapers just swiping. Its amazing app.
https://play.google.com/store/apps/details…
4.Instant- Quantified Self - Automatically keep track of the time you use your phone & apps, fitness, places and travel time. Try it.
https://play.google.com/store/apps/details…
5.Floating Apps FREE - multitask - You can create your own floating apps from home screen widgets or any URLs now!
https://play.google.com/store/apps/details…
Important Secret Code For Andriod User's............
***************
***************
*#06# Displays imei
*2767*5282# Java reset and
(deletes all java midlets)
*2767*63342# Reset media
(deletes all sounds and pics)
*2767*927# Wap reset
*#9998*4357# Help menu
*#9998*5282# Java menu
*#9999#0# Monitor mode
*#9999# Software version
*#8888# Hardware version
*#9998*746# Sim info
*#9998*523# Display contrast
*#9998*842# Vibration on (until
you push ok)
*#999*289# Buzzer on (until you
push ok)
*#9998*288# Battery and field
information
*#9998*377# Error log
*#9998*778# Sim service table
*#9998*782# Show date and
alaram clock
*#8999*638# Show network
information
*#9998*5646# Change operator
logo at startup
*#9998*76# Production number
*#9998*968# View melody for
alarm
*#9998*585# Non volatile
memory
*#3243948# Digital audio
interference off
*#32436837# Digital audio
interference
*#9999# Show software versions
*#0837# Show software version
(instruction)
*#0001# Show s*r*al parameters
*#9125# Activates the smiley
when charging
*#9998*228# Battery status
(capacity, voltage, temperature)
*#9998*246# Program status
*#9998*324# Debug screens
*#9998*364# Watchdog
*#9998*427# Trace watchdog
*#9998*544# Jig detect
*#9998*636# Memory status
*#9998*837# Software version
*#9998*862 Vocoder reg-normal,
earphone or’ carkit can be
selected
*#998*872# Diag
*#9998*947# Reset on fatal
error’
*#9998*999# Last/ check
*#9998*9999# Software version
*2767*2878# Custom EEPROM
reset
Internet Download Manager (IDM) 6.31 Build 3 Free download
Internet Download Manager (IDM) is a very popular, useful and powerful application for downloading. It increase download speeds by up to 5...
-
To create a bootable USB drive as a Windows installation media, we require at least 4 GB for minimum capacity. Larger capacity is better...
-
Here is a list of Bangladesh Mobile Company : Teletalk, GrameenPhone, Robi, Citycell, Airtel. My Airtel Number *121*6*3#...
-
mobile theke bangla dekhte holey : 1. go to : http://operamini.com/ 2. download operamini and install 3. now, open operam...